I totally understand where you’re coming from! I’ve been in the same boat, spending hours on drawings only to find them looking stiff and dull—more times than I can count. I’ve been into drawing for years, and a good chunk of that time was dedicated to cracking the code on how to give my drawings that confident, lively flow instead of that rigid feel. It took me a while to get there, but I’m excited to share what finally worked. So, let’s dive in: Why exactly do drawings sometimes end up looking stiff?
Drawings can look stiff when an artist is overly cautious. A balance of gesture, light to dark, thin to thick, and straight or curved lines, is essential to ensure your drawing looks fluid and confident. This blend prevents stiffness and brings life to the artwork.
Now, get ready to dive into a treasure trove of insights. From techniques that banish stiffness to pro tips on mastering the interplay of light and dark, I’m here to guide you through it all. So, if you’re itching to discover the secrets that can truly transform your drawings, keep reading – you’re in for a treat!
Why Do My Drawings Look So Stiff?
The things that lead to drawings looking stiff can differ from artist to artist. Since I can’t see your drawings directly, the best way for me to assist is by giving you a complete rundown on how to avoid those rigid, stiff drawings. This way, you’ll have all the tools you need to tackle the issue yourself!
First, you need to know that drawings look stiff for three main reasons that break down into multiple subreasons. The first reason is being overly cautious, the second is a lack of gesture, and the third is a lack of line quality. These three are equally important, and a good blend of them will make your drawings level up significantly.
To make this blog easy to digest, I will first talk about confidence and how your feelings transmit to the paper, and then divide gesture and line quality into its elements.
1- Your Lines Need More Confidence
One of the most common reasons artists produce stiff drawings is that they worry too much about every stroke. Being so worried and careful makes you draw your lines too slowly, and that stops fluidity. It makes you hold your pencil too hard, and that prevents subtlety. See, art is like a window into the artist’s thoughts and feelings. If you’re feeling tense, anxious, uncertain, or downcast, those emotions can show in your art.
So, creating those wonderfully free and lively drawings really comes down to having a free and lively mindset. If you approach each line as if you’re just letting your creativity flow without overthinking, you’ll see that energy reflected in your work!
Scratchy, messy lines also have a purpose: exploring. When you are exploring drawing poses, drawing from imagination, or just constructing the initial structure of your drawings, it is completely okay to draw lines that wouldn’t look “confident”, because you will eventually clean it up, draw it again, or just leave as a study you were doing.
However, if these messy lines are part of the final product, and you didn’t intend to do that, then you need to review and practice your line quality.
Tip: As you grow as an artist, you realize it’s okay to admit, “I’m feeling scared, nervous, and uncertain,” and then you can channel those emotions into your work. You harness that energy and intentionally infuse it into every stroke. To break free from stiffness in your drawings, you need to embrace yourself just as you are in that moment.
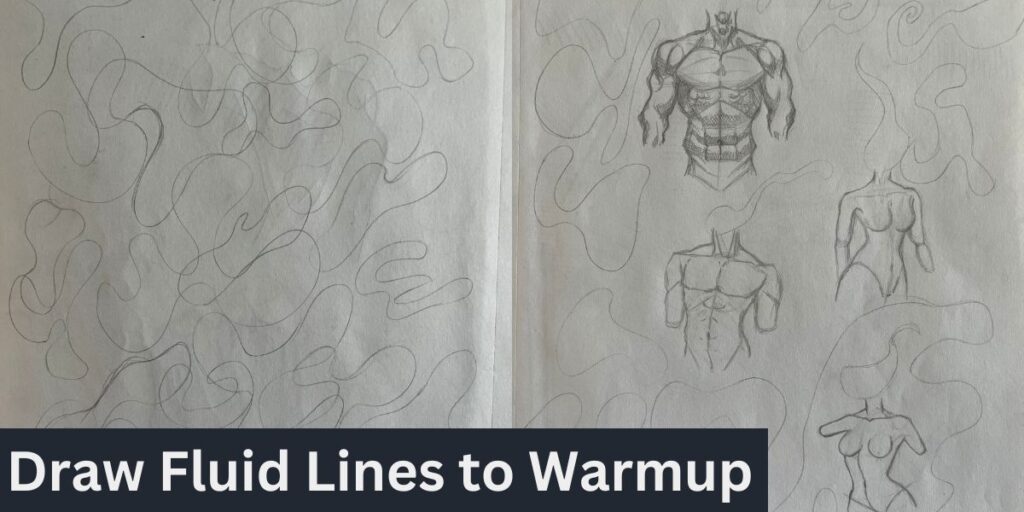
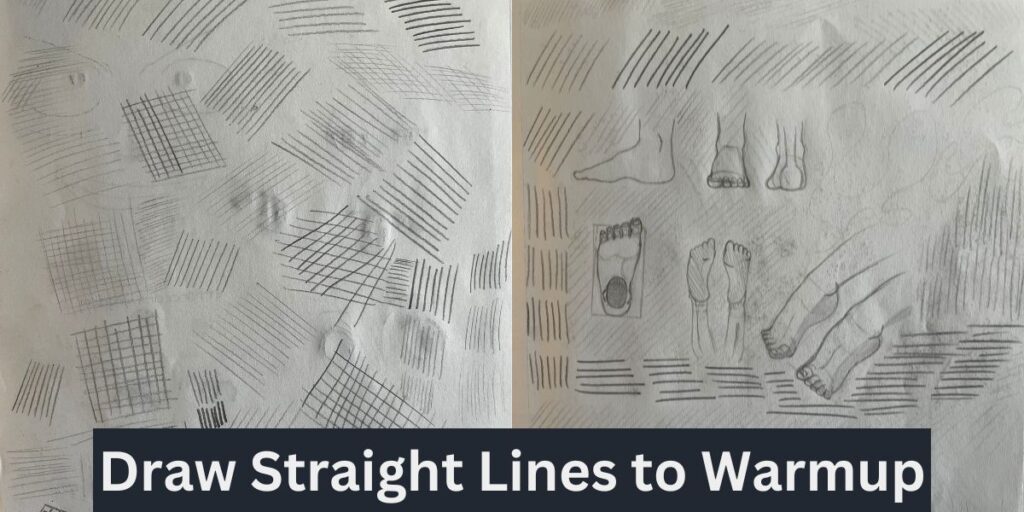
How To Make Your Art Less Stiff
How to fix it: A stiff hand will create stiff drawings. Practice drawing warmups before starting your sketching session. Sketching without rules will help you get closer to the mentality needed to draw better, dynamic, confident lines. Below are some exercises you can try to warm up. Again, don’t approach every line you draw as if you were defusing a bomb! Take a deep breath, loosen your pencil grip, and draw at a speed that works best for you.
Or
Reason six will include a follow-up on this, in which you will be able to combine warming up and practice to draw your best lines.
Let’s jump into the next reason.
2- Your Drawings Lack Gesture
One of the main reasons your drawings look stiff, if not the most common one, is because you draw them in a stiff pose. This is normal! We tend to draw what we know and play it safe, but exploring more dynamic poses will be critical to making your drawings less stiff.
Include Gesture In Your Drawings
That’s where gesture drawing comes in—it serves as a way to study figures in motion, be it the human figure or any other. Poses can indicate millions of things, including stiffness, so you need to start studying gestures if you want a drawing that doesn’t look rigid.
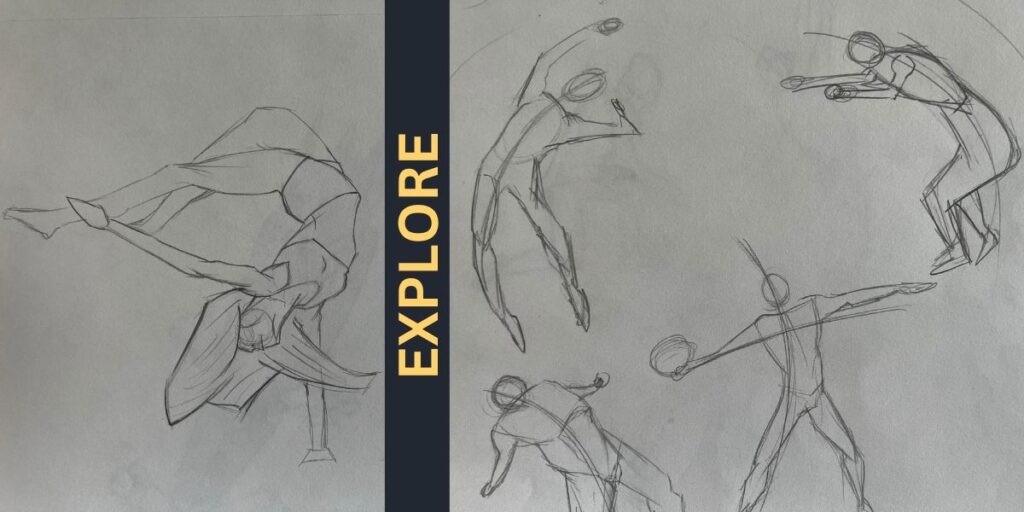
How to fix it: Deviate from commonness! No more drawings in basic poses until you draw at least five dynamic poses, even if they look bad! You can do this by searching for dynamic poses online and drawing them with only gesture as the main focus of the practice. Details don’t matter; instead, focus on capturing the energy of the pose. Get inspired by your favorite artists and study their drawings by doing them yourself. And if you want an excellent reference for dynamic poses, google Spider-Man, haha!
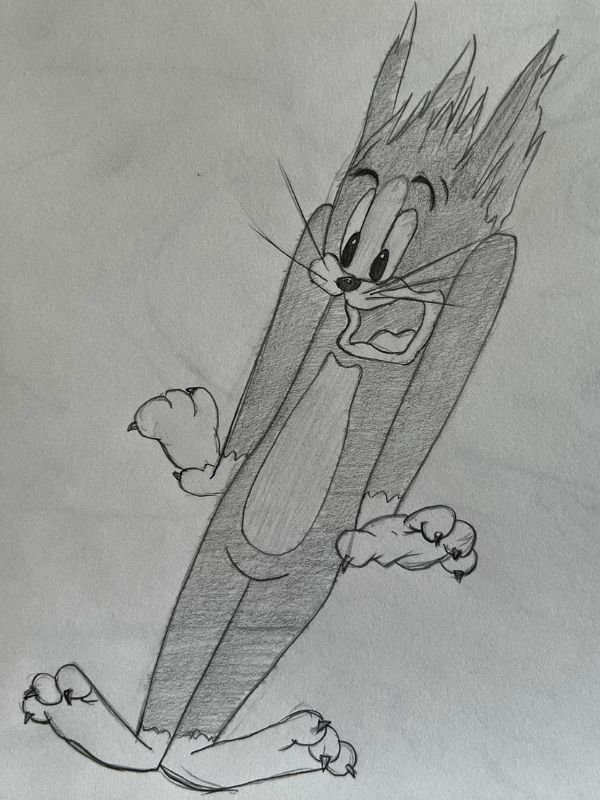
Tip: Stiff poses can also be very powerful and meaningful in your drawings when used correctly. So it’s okay to draw stiff poses as far as that’s your goal! Here is a fun example of that.
Let’s see the next reason!
3- You’re Starting Your Drawing Without a Plan
When we start drawing anything without a plan or reference, we will most likely draw a stiff pose unconsciously. If your goal is to create more vivid, interesting drawings, then you need to focus on pushing limits and exploring until that becomes second nature to you.
Now, having a plan doesn’t mean you will be constricted. On the contrary, I want you to have something that allows you to explore and make it easier for you to create something different from what you did before. For that, I introduce you to a fundamental concept of gestural drawing, the line of action.
Use The Line Of Action in Your Drawings
The line of action in drawing, also referred to as the “line of force” or “line of motion,” is a fundamental concept in art and animation. It’s a dynamic and imaginary line that helps convey a subject’s overall movement, energy, and direction, typically a character or object within a composition.
The line of action is the first line you draw, and it sets the pose or mood of a drawing. This line of action usually represents the spine, as it is the most influential part of the body regarding movement. The more dynamic the line is, the more vibrant your drawing will be.
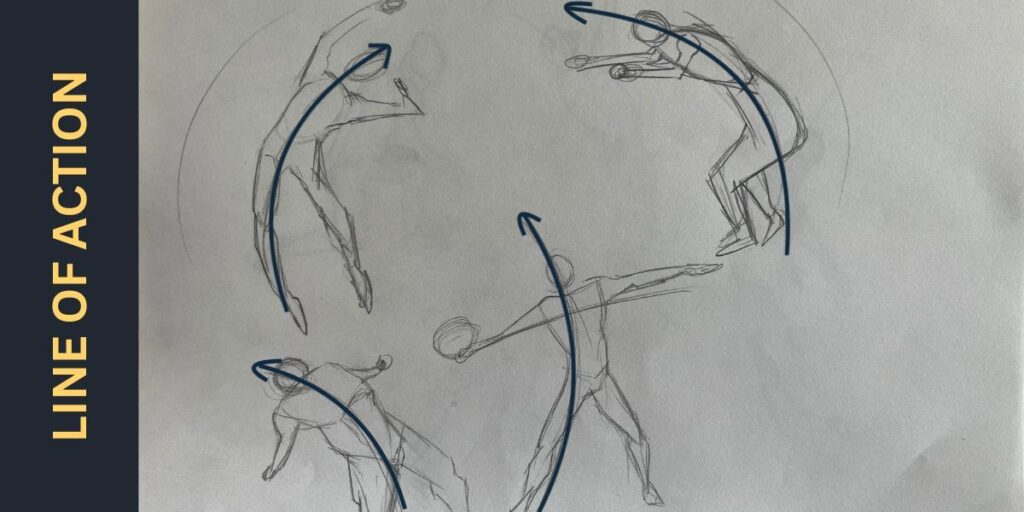
You can also use more than one line of action in a drawing to help you simplify the pose you envision.
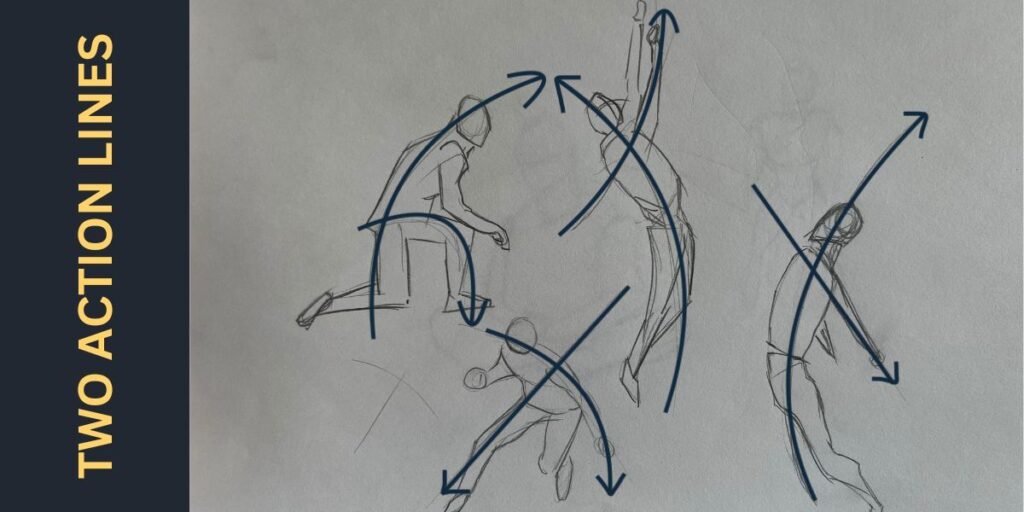
How to fix it: Start your drawings by drawing a line of action and then try to fit the subject into it. If you start your drawing by the head, creating poses that don’t look stiff will be harder. If you practice this enough times, it will eventually become second nature. Many proficient artists still use this line in an imaginary way; they draw it in their head first and then fit the character into it, but without getting ahead of ourselves, let’s start by drawing it lightly first!
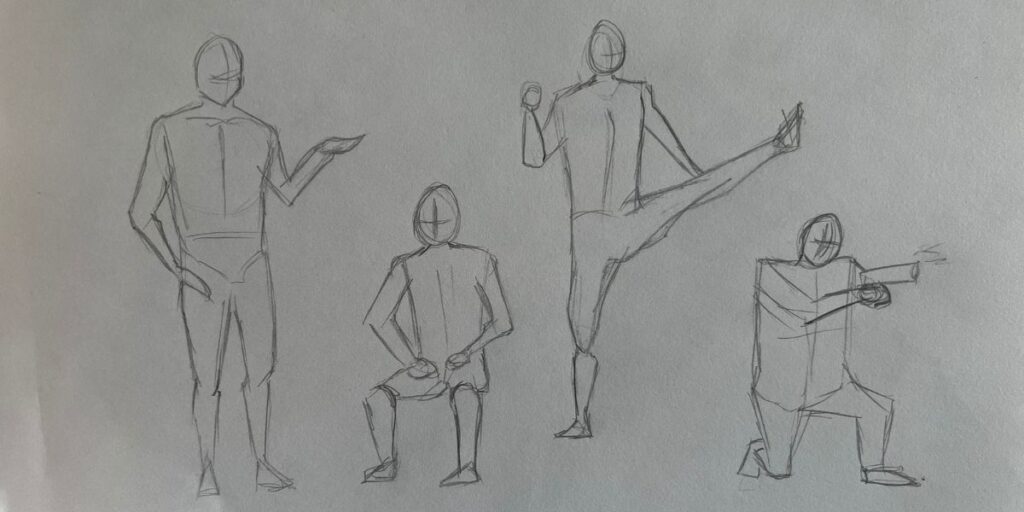
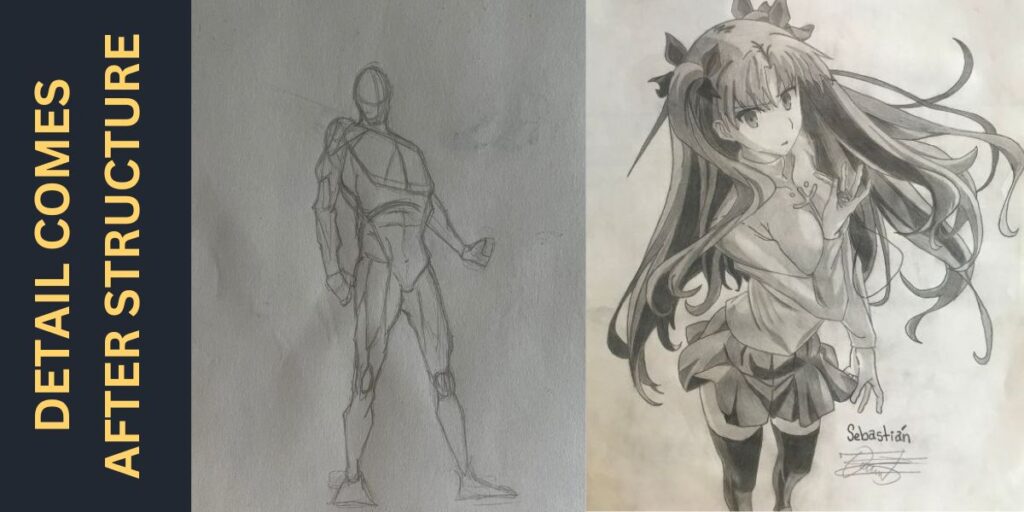
Tip: Use most of your time drawing many different poses and experimenting instead of trying to draw masterpieces every single time. Unless you are turning a pose into a complete drawing, you shouldn’t draw them with too many details. That’s why I’m showing you drawings of the initial steps to achieving less stiff poses, and not completed, detailed drawings. If you draw enough poses, the next step would be to learn about anatomy and how to add detail to them. You would eventually start drawings things like this, depending on your artistic approach!
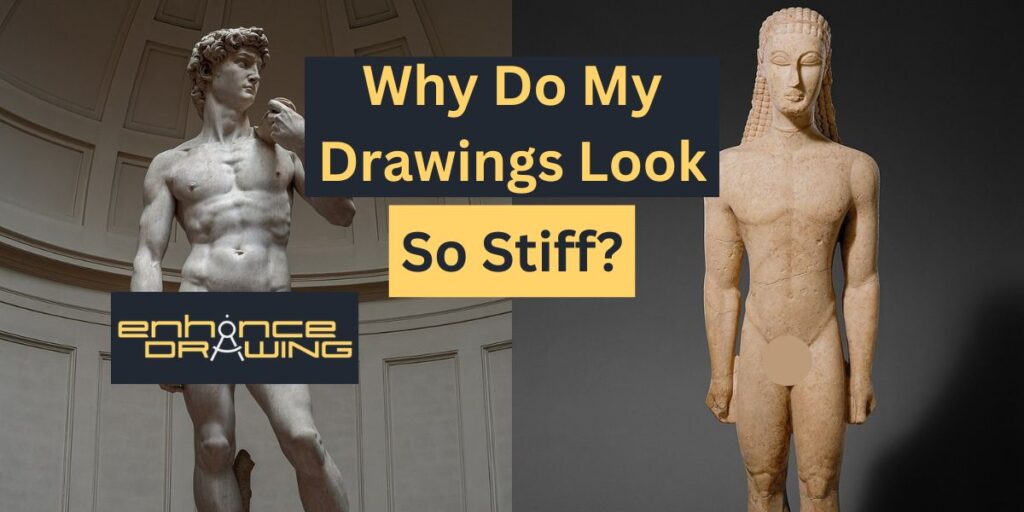
4- Your Drawings Are Too Symmetrical
Using symmetricity unconsciously is the perfect formula for stiffness. I’m not saying it is bad to draw symmetrical drawings; in fact, some fantastic art is supersymmetric, and we love it. However, it is not a helpful tool when making your drawings look less stiff.
What is a helpful tool, though, is contrapposto. So, it is time to introduce you to another really helpful tool to make your drawings more lifeful.
Use Contrapposto in Your Drawings
Contrapposto is a term used in art to describe a specific pose or stance of a human figure. It is characterized by a subtle shift in the body’s weight distribution. By using contrapposto, artists can create figures that appear more lifelike and less rigid, making their art more engaging and relatable.
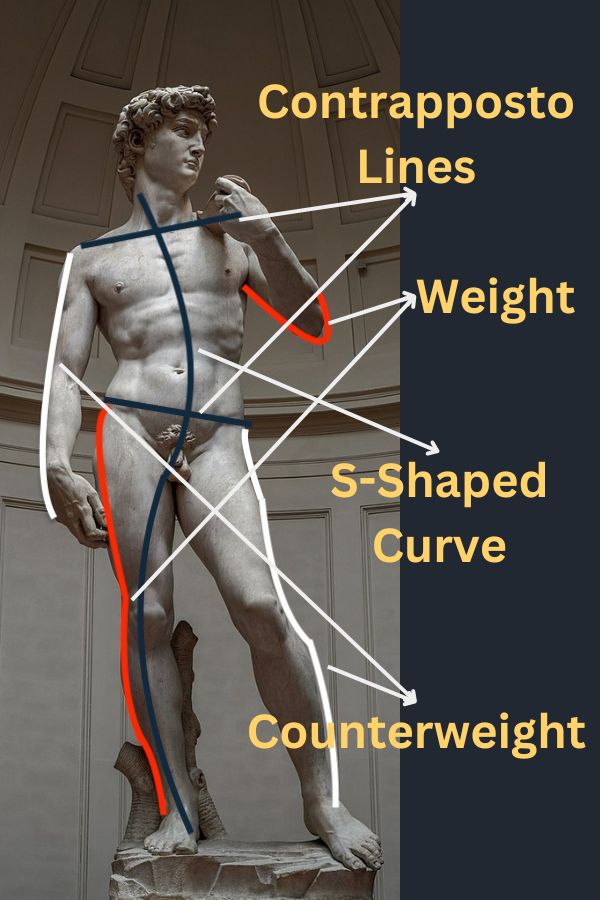
Some key features of contrapposto include:
1. Weight Shift (Contrapposto lines): In a contrapposto pose, the weight of the figure is shifted onto one leg, which becomes the weight-bearing leg, while the other leg is relaxed or slightly bent. This creates a sense of balance and asymmetry in the figure’s posture.
2. S-Shaped Curve: The shift in weight and stance results in an S-shaped curve through the figure’s torso and spine. This curve adds a sense of fluidity and movement to the pose.
3. Counterbalance: The upper body and arms often counterbalance the weight-bearing leg to maintain balance. For example, if the right leg bears the weight, the torso may lean slightly to the left, and the arms might extend in different directions to counter the weight shift.
With Michelangelo’s example, you can easily see why contrapposto is crucial to making very natural, very “human” stances. I can see myself standing like that while waiting for the metro to arrive or in line to get my coffee.
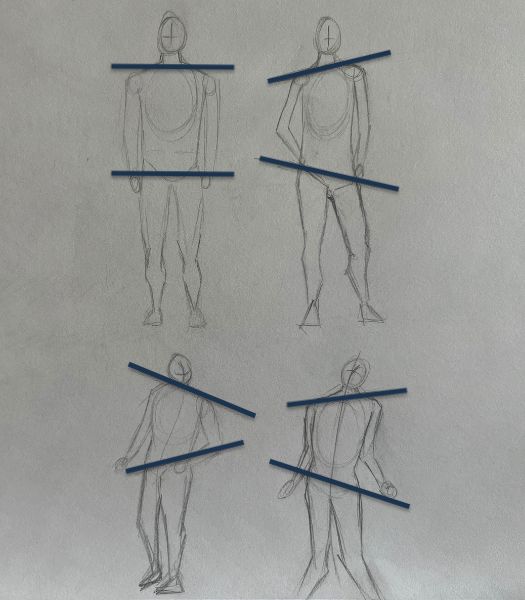
How to fix it: Start implementing contrapposto to your drawings. Symmetrical stances look a bit unnatural and boring when used incorrectly. See how these rather stiff drawings can become more engaging and natural when applying contrapposto.
5- Your Drawings Needs More Line Variety
Not everything is “poses” when making a drawing less rigid. To me, line variety is equally as important as the poses of our characters. Every line we draw in the paper has energy behind it; it has life. That’s why if you draw something twice, it will look different -even if it has the same proportions.
Lines can represent subtlety or force, light or dark, proximity or distance, and controlling these is what will fill your drawings with life and energy. Doing this can be so efficient that drawings could look less stiff by just applying this. So, it’s time to introduce another amazing drawing concept to your toolbox: line quality.
Line quality is a fundamental element of drawing and is essential for conveying depth, form, and meaning in a work of art. By manipulating how lines are drawn, including thickness, texture, weight, direction, and variation, artists can create various visual effects to communicate their ideas effectively.
So, how do these concepts look on paper? Here are a few things you can do with lines to communicate different ideas.
Light:

By making lines thinner and lighter, you can trick our brains into thinking that the wine glass is shining, even though a 2D pencil drawing can’t produce light.
Distance:
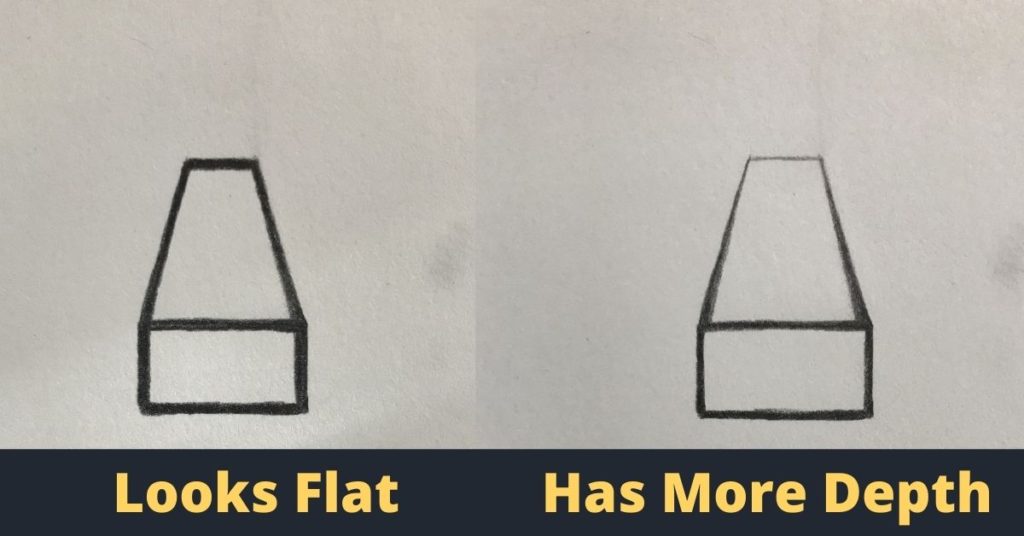
By making the lines on the front thicker and the lines behind thinner, you can trick your brain into thinking there is depth.
I have a whole blog about line quality you can read if you want to see more examples and exercises for this topic.
Now, your drawings can use line variety in any way you want with the sole purpose of making your linework look cool. For that, I want to show you an example of how much vibrant a drawing can look when it has line variety.
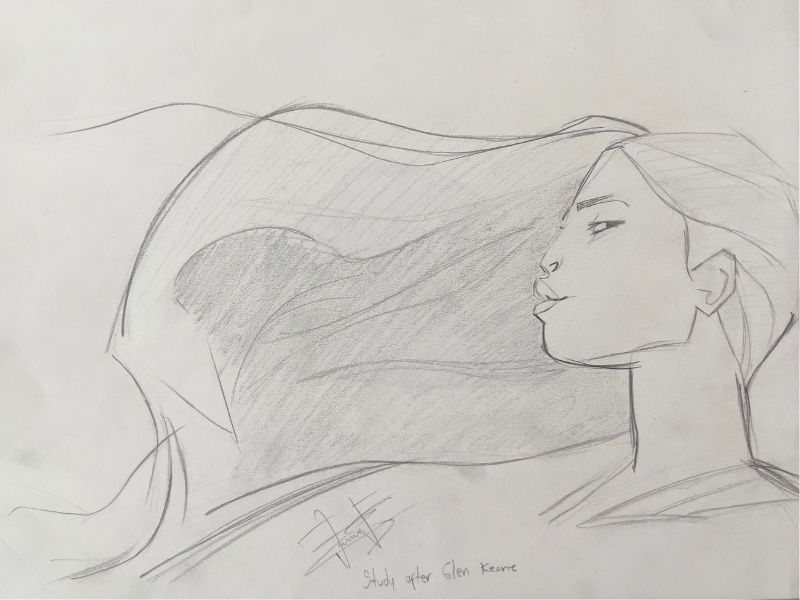
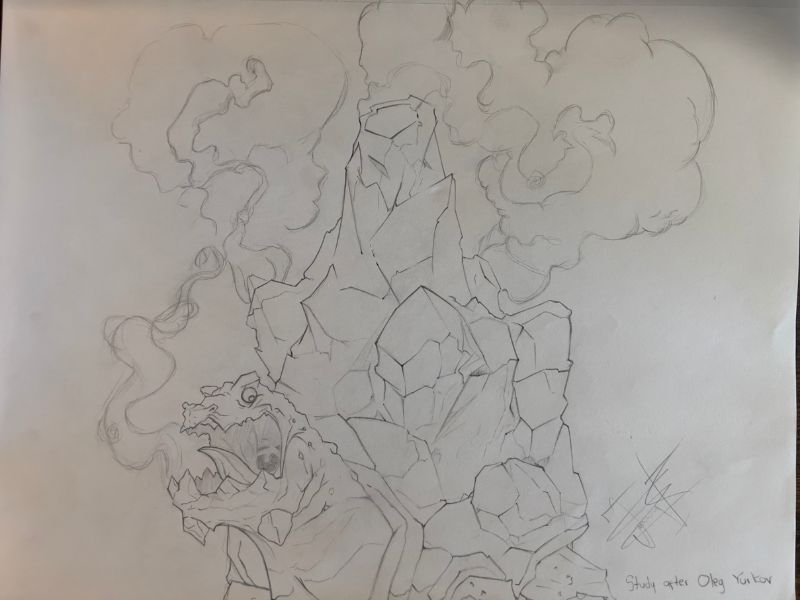
In this drawing study I did of Glen Keane, you can see a wide variety of tones and thicknesses in the lines, making the drawing more vivid. You can see a very light, thin, and subtle line in the nose to make it more delicate, but you can also see a very thick, dark line in the chin to make it more powerful and notorious. You make these decisions as you draw, and there are no rules (unless you want them)
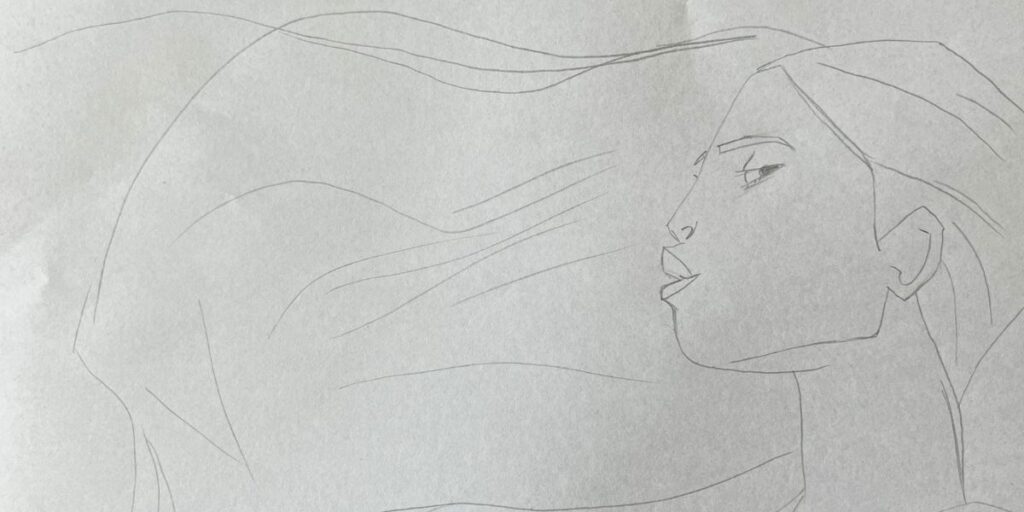
To show you how important this is, take a look at the same drawing without the line variety. It looks so much less interesting!
Make Your Drawings More Lifeful
How to fix it: Start adding line variety to your drawings. Drawings are combinations of hundreds of lines, and the more beautiful your lines are, the more beautiful your drawing will be. A great to do this is to do master studies. These are drawing studies you do of the artists you admire, but instead of focusing on accurate proportions (which are still important), you will focus more on recreating the lines the original artist made.
Let’s see the next example.
6- You Don’t Know When You Draw Your Best Lines
I don’t know if you were aware of this, but you will after this reason. Every person who draws has specific lines they draw better than others based on the position of their hand and arm. That includes you.
Ever wonder why you shift the page or book you are drawing on? You do it because you know, consciously or unconsciously, that you will draw that line better if you move the position of your arm or hand or just move the paper.
So here’s an exercise you can do to know when you draw your best lines, as well as when you draw your worst lines, and decide if you want to practice them or not.

Follow-up from reason 1! Once you identify the lines you draw best and worst, you’re free to choose which ones you want to improve. To practice them, draw the line you picked multiple times as a warmup exercise before starting your drawing session.
Make Your Drawings Look Better
How to fix it: Now that you know when it is that you draw your best lines, use it to your advantage when drawing. If you are about to draw a line you don’t draw well, move the paper and draw it from an angle you know you will produce the best result. You can also change the angle of your arm. Your drawings will look the best they could when doing this. Make sure to practice the other lines so you can draw better and faster!
Now, let’s go to the next reason.
7 – You Haven’t Drawn For Long Enough
I promise this is not a filler reason. In fact, experience could potentially be the main reason your drawings don’t look as you wish them to. Look at some drawings I did when I was a kid.
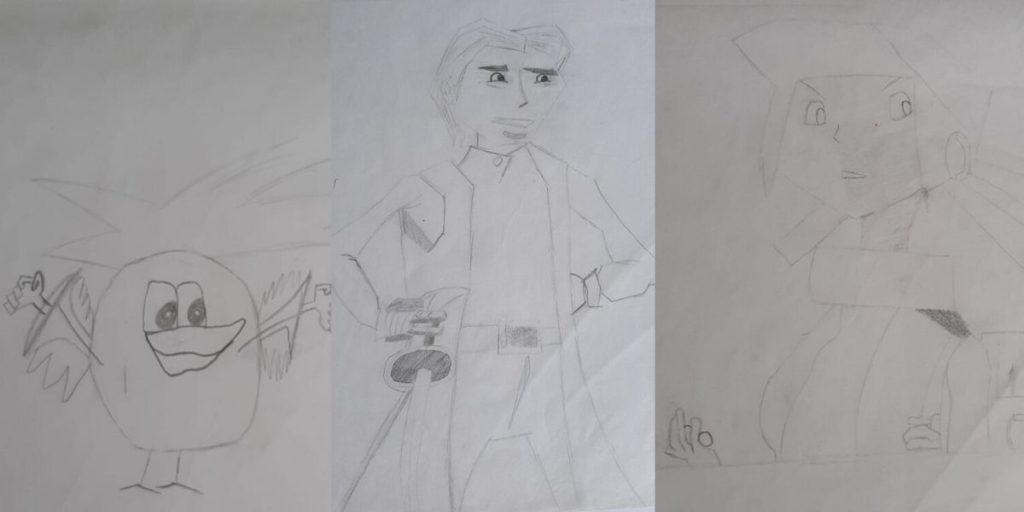
As you can see, they look kind of stiff and rigid. But I practiced a bunch and got to draw much better eventually. These are some drawings I did around ten years later.
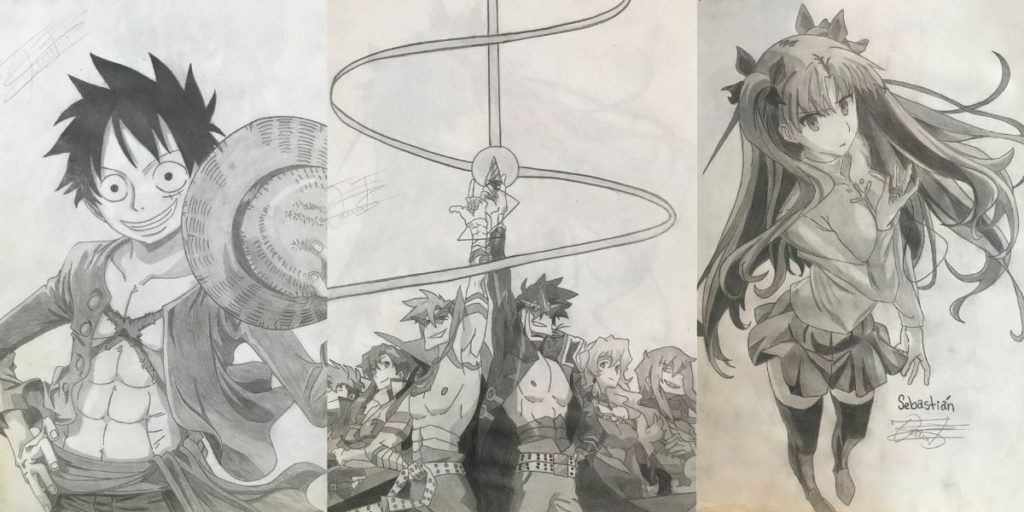
And I keep exploring, studying, practicing, and learning every day!
So, I want to reassure you that you will eventually draw anything without it looking stiff if you just keep drawing. However, I learned something about my drawing journey: I should’ve had a plan to study drawing. See, just drawing is not enough; what’s really important is to learn basic fundamentals and practice mindfully.
Tip: Experience by itself is not enough. Good experience will be good, and bad experience will be bad; I’ll elaborate. If you have a lot of experience drawing crooked lines because you haven’t reviewed your technique, it will be so much harder to stop drawing crooked lines. But if you reviewed your technique and had a plan to practice how to draw straight lines early on, you will save lots of time.
So these are the pillars you need to draw better: Patience, structure, and experience.
How to fix it: Draw more and more often! I know this is easier said than done, but you must get as much drawing practice as possible to make your drawings look like you want them to. Create a space to draw every day, every other day, or as often as you can, and try to stick to it.
If you need a hand to help you make drawing a habit, you can check this blog I made all about it. I include all the aspects of how I was able to make drawing a habit, as well as a 21-day drawing plan you can follow to help you get into the habit of drawing and improve your drawings significantly.
Congrats if you made it this far; I appreciate you taking the time to read my blog!
I wish you the best on your artistic journey!